
When you hear the words "it's broken," your world can feel like it's been turned upside down. With an ankle fracture, your first question is likely, "What can I even do right now?" The simple, honest answer from a physical therapist is: it depends. Your recovery is a personal journey, influenced by the type of fracture and your doctor's specific orders.
So You Broke Your Ankle. What Happens Now?
Hearing that diagnosis is a gut punch. We get it. Here in our clinic, we've helped countless people—from marathon runners to busy parents—navigate this exact journey. It’s not the end of the road for your active life; it's just a detour.
The key is understanding that recovery isn't a straight line. It’s a phased process, and trying to skip a step is the fastest way to set yourself back. This guide is your roadmap. We’ll cut through the confusion and lay out the evidence-based approach we use every day to get people back on their feet.
Your Unique Recovery Journey
First things first: no two ankle fractures are the same. A simple, clean break of one bone (like the fibula) has a very different recovery path than a complex trimalleolar fracture where multiple parts of the ankle are involved. Whether you had surgery or are healing in a cast also dramatically changes the game.
That’s why a "one-size-fits-all" list of exercises just doesn't work. Initially, your focus isn't on strengthening the ankle at all. It's about creating the right environment for the bone to heal.
Your initial goals will be:
- Protecting the injury to allow the bone to mend properly.
- Managing swelling and pain with elevation and ice.
- Maintaining mobility in the joints you can move, like your toes and knee.
This isn’t just about waiting around—it’s an active process of setting the stage for a successful recovery. You are not alone in this. Ankle fractures are incredibly common. Globally, lower extremity fractures, including the ankle, accounted for nearly 35 million new cases in 2021 alone. You can read the full research on fracture prevalence to see just how widespread these injuries are.
Our PT Philosophy: Think of this like building a house. You can't put up the walls before the foundation is solid. This early phase is all about pouring that concrete—protecting the area so it can heal strong. Rushing this step only leads to cracks in the foundation later on.
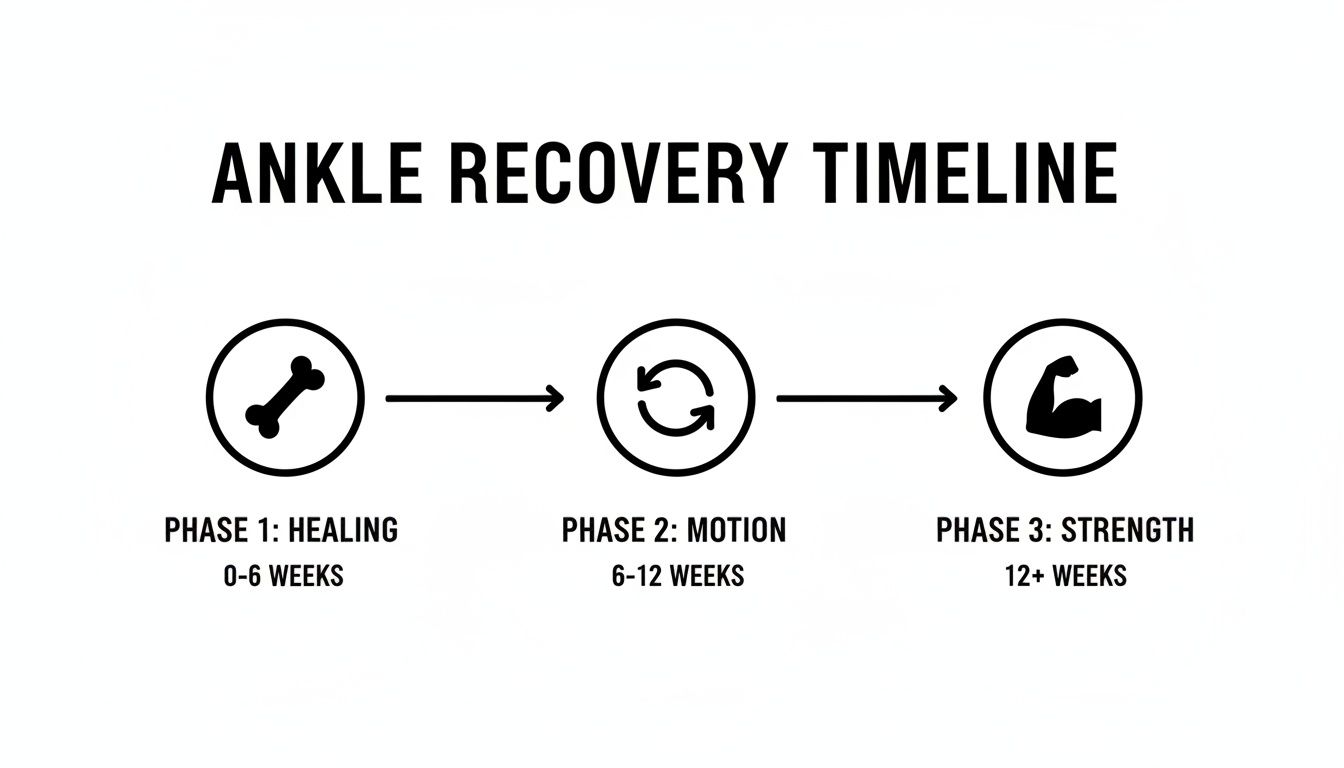
To give you a clearer picture, this table breaks down the typical recovery journey.
Your Ankle Recovery Roadmap At a Glance
| Recovery Phase | Typical Timeline | Main Goal | Example Activities |
|---|---|---|---|
| Phase 1: Protection & Healing | Weeks 0-6 | Bone healing, pain/swelling control, protecting the surgical site (if applicable). | Non-weight bearing, gentle toe curls, knee/hip exercises, crutch training. |
| Phase 2: Restoring Motion | Weeks 6-12 | Regaining range of motion, introducing partial weight-bearing as advised by your doctor. | Ankle alphabet, calf stretches, towel scrunches, stationary biking with no resistance. |
| Phase 3: Building Strength | Weeks 12+ | Full weight-bearing, building strength and stability for a return to normal activity. | Calf raises, single-leg balance, squats and lunges, progressing to hopping/running. |
This roadmap shows how each phase builds on the last, emphasizing that you can’t skip steps. It’s a journey from protection to performance.
For a deeper understanding of how physical therapy guides this process, you can learn more about our approach to orthopedic physical therapy. We’re here to guide you through each phase, ensuring you have the right exercises at the right time to get you back to the life you love.
Early Healing and Gentle Movement (Weeks 0-6)
The first six weeks after breaking your ankle can feel like a waiting game. We see it as the foundation for your entire recovery. Your body is working hard to mend the bone, and your main job is to create the best environment for that healing to happen.
Whether you’re in a hard cast or a walking boot, your goals are simple: protect the ankle, manage the swelling, and prevent unnecessary stiffness and muscle loss in the surrounding areas.
Think of it this way: your ankle is a construction site with a “Do Not Disturb” sign hanging on it. But that doesn’t mean the rest of the leg gets to shut down. Keeping everything else moving is crucial.
Why Gentle Movement Matters Right Now
Even though your ankle is immobilized, you can—and should—be doing very specific, gentle exercises. This isn’t about strengthening the fracture itself. That comes much later. Instead, these early movements are all about supporting the healing process.
Why is this so critical?
- It Boosts Circulation. Gentle muscle contractions, even just wiggling your toes, act like a small pump. This helps push swelling out and brings in fresh, oxygen-rich blood that healing bones desperately need.
- It Maintains Nerve Function. When you don’t use a part of your body, the nerves can get a little “sleepy.” Simple movements keep those communication lines between your brain and foot active.
- It Prevents Secondary Problems. An immobilized ankle often leads to a stiff knee and hip. By keeping those joints moving, you’ll have fewer issues to unravel later in your rehab.
Our PT Perspective: The biggest mistake we see people make in this phase is doing absolutely nothing. They hear “rest” and assume it means being completely still. That can actually lead to more muscle loss and stiffness down the road. Smart, safe movement is your best friend right now.
Safe, Non-Weight-Bearing Exercises
You should only perform these exercises after your doctor or physical therapist has given you the green light. They are designed to be gentle and should never cause sharp pain.
Toe Curls and Spreads:
- What to do: While sitting or lying down, slowly curl your toes as if you’re trying to grip a small towel. Hold for a few seconds, then relax. Next, try to spread your toes apart as wide as you can and hold.
- Why it helps: This is one of the safest ways to fire up the small muscles in your foot, which promotes blood flow without putting any stress on the ankle. Aim for 2-3 sets of 10-15 reps a few times a day.
Ankle Alphabets (If Permitted):
- What to do: If your doctor allows some movement out of your boot or cast, pretend your big toe is a pen. Slowly and gently trace the letters of the alphabet in the air.
- Why it helps: This encourages your ankle to move in multiple directions, helping prevent the joint capsule from getting too tight. Keep the movements small and well within a pain-free range.
Knee and Hip Mobility:
- Don’t forget the rest of the leg. You can perform heel slides (sitting down and sliding your heel toward your buttock, then straightening it out) and quad sets (tightening the large muscle on the front of your thigh). These are key for preventing significant muscle weakness.
Red Flags to Watch For
Ankle fractures are incredibly common—in 2021 alone, there were over 78 million new lower extremity fractures globally, many caused by simple falls. You can read more on the global impact of these injuries in recent public health research.
While healing is a predictable process, you need to know when something isn’t right. Call your doctor immediately if you experience any of the following:
- A sudden, sharp increase in pain that doesn’t go away.
- Swelling that gets much worse instead of better.
- Any new numbness, tingling, or color changes in your toes (like turning blue or white).
- Fever or signs of infection around an incision site, like redness, warmth, or discharge.
This first phase demands patience, but the careful work you put in now will pay huge dividends in the weeks to come.
Regaining Motion and Starting to Bear Weight (Weeks 6-12)
This is a huge moment in your recovery. After weeks of keeping your foot off the ground, hearing you can finally start putting weight on your ankle is a massive psychological win. We celebrate this milestone with our patients every single day.
But—and this is a big “but”—it’s not a free-for-all. This phase is all about a gradual, intelligent reintroduction to load. Your bone has healed enough to take on some work, but the surrounding muscles are weak, the joint is stiff, and your sense of balance is completely out of whack.
Our goals now are to restore your ankle’s range of motion and carefully begin weight-bearing. Think of it like learning to walk all over again. You wouldn’t start with a sprint; you’d begin by just standing, then taking a tiny, supported step. We’re going to apply that exact same logic here.
The Gentle Art of Restoring Motion
Your ankle has been locked in place for weeks, so that stiffness you’re feeling is completely normal. Our first job is to gently coax that joint into moving again with some targeted range-of-motion work.
It’s helpful to know the difference between passive and active motion, as we’ll use both:
- Passive Range of Motion (PROM): This is when something else moves your ankle for you. You might use a towel, a strap, or your own hand to guide the joint while your muscles stay relaxed.
- Active Range of Motion (AROM): This is when you use your own muscles to move the ankle. The “Ankle Alphabets” from the first phase were a classic example of AROM.
We blend these two approaches. PROM helps gently stretch the tight joint capsule and ligaments, while AROM begins to wake up the muscles that control the ankle.
Our PT Insight: We often see patients who are afraid to push into that stiff feeling, worried they might be causing damage. The truth is, a gentle, sustained stretch is exactly what the joint needs to break up scar tissue and regain mobility. The key word is “gentle”—it should feel like a productive stretch, never a sharp or stabbing pain.
Core Ankle Motion Exercises
These are the bread-and-butter exercises we start with to get things moving. Remember, the goal right now is flexibility, not brute strength.
Towel Stretch for Dorsiflexion:
- What to do: Sit on the floor with your leg straight out. Loop a towel or resistance band around the ball of your foot. Gently pull the towel toward you, feeling a stretch in your calf and the back of your ankle.
- How often: Hold for 30 seconds, relax, and repeat 3-4 times. Aim to do this several times a day. This is absolutely critical for regaining the motion needed to walk normally.
Ankle Inversion and Eversion:
- What to do: Sit in a chair, foot flat on the floor. Slowly roll your ankle inward, so the outside edge of your foot lifts. Then, slowly roll it outward, lifting the inside edge. Keep these movements small and controlled.
- How often: Perform 10-15 slow reps in each direction for 2-3 sets.
Once you’re moving more comfortably, we can start adding light resistance to begin rebuilding those dormant muscles.
Starting to Bear Weight Safely
Hearing “you can start putting weight on it” can be both exciting and terrifying. Your ankle hasn’t supported you in over a month, and it’s going to feel weak and unstable. That’s why we always start with partial weight-bearing.
We don’t just tell patients to “walk on it.” We give them a clear, progressive plan.
- Touch-Down Weight: While on your crutches, just allow your foot to rest on the floor when you stand. Don’t push down; just let it feel the sensation of the ground.
- “Eggshell” Weight: Now, imagine there’s an eggshell under your foot. Put just enough pressure on it that you wouldn’t break the shell. This is a fantastic mental cue to help you meter the force you’re using.
- Increase to 50% Weight: Use a bathroom scale for this. If you weigh 150 lbs, practice putting 75 lbs of pressure through your foot. This helps your brain and body reconnect and build confidence.
- Full Weight-Bearing: As you get more comfortable and your pain stays low, you can gradually stand on both feet, eventually taking steps with less and less support from your crutches.
This entire process can take a couple of weeks, so don’t rush it. Let pain be your guide—if it spikes, you’ve done too much. Just back off and try again tomorrow with a little less load.
Building Strength and Proprioception (Weeks 12+)
If you’ve made it this far, congratulations. The bone has healed, you’ve put in the work to get your motion back, and now we get to the part we love as physical therapists. This is where you graduate from simply being “healed” to becoming strong, stable, and resilient.
Starting around week 12, we shift gears. The main goal is no longer just about protecting the bone. It’s about rebuilding the muscle you’ve lost and, just as crucially, retraining your ankle’s proprioception.
Proprioception is a clinical term for your body’s internal GPS. It’s the sense that tells your brain where your foot is in space without you having to look down. After a fracture and immobilization, this system goes completely offline. Getting it back is the single most important thing you can do to prevent another injury down the road.
From Basic Strength to Functional Power
Real-world strength isn’t just about pushing against a resistance band. It’s about having the power and control to walk on uneven ground, carry groceries up the stairs, or get back to the sport you love without a second thought.
We build this strength progressively, starting with the fundamentals.
Calf Raises: This is the foundation of lower leg strength. Your calf muscles are the engine for pushing off every time you take a step.
- Double-Leg Calf Raises: Stand on both feet and slowly rise onto the balls of your feet. Hold that top position for a second, then control the movement all the way back down. Your goal is 3 sets of 15-20 repetitions.
- Single-Leg Calf Raises: Once the double-leg version feels easy and pain-free, it’s time to progress. Stand on just your injured leg, holding onto a counter for support. This is a massive step forward in building back functional strength.
We tell our patients that mastering the single-leg calf raise is a major green light. It shows that the ankle is ready to handle the full force of your body weight, which is exactly what happens with every single step you take.
Functional Strengthening Exercises:
These movements recruit the entire chain of muscles from your foot all the way up to your hip.
- Step-Ups: Using a small step or the bottom stair, step up with your injured leg. Focus on driving through your heel to engage your glutes, then slowly lower yourself back down with control.
- Single-Leg Romanian Deadlifts (RDLs): This is a fantastic drill for balance and strengthening your hamstrings and glutes. Standing on your injured leg (with a soft knee), hinge forward at your hips while keeping your back flat. Let your other leg drift back behind you for balance. Go as far as you can control, then squeeze your glutes to return to the start. Begin with just your bodyweight.
Retraining Your Ankle’s GPS: Proprioception Drills
A strong ankle is good. A strong and smart ankle is what keeps you out of a walking boot. Proprioception exercises force the small stabilizing muscles around your joint to make constant, tiny adjustments to keep you upright.
We start simple and add layers of difficulty by changing two variables: the surface you’re on and whether your eyes are open or closed.
Single-Leg Stance Progression:
- Firm Surface, Eyes Open: The starting point. Just stand on your injured leg and try to hold your balance for 30-60 seconds.
- Firm Surface, Eyes Closed: This is surprisingly hard. Taking away your vision forces your ankle to do all the work.
- Unstable Surface, Eyes Open: Now, stand on something that gives a little, like a pillow, a cushion, or a folded yoga mat.
- Unstable Surface, Eyes Closed: The final boss. This combines both challenges and is the ultimate test of your ankle’s stability.
Once you’re confident, you can add dynamic movements, like tossing a ball against a wall while balancing. That distraction makes your ankle’s stabilization system work automatically, which is exactly what needs to happen in real life. These are some of the most effective ankle broken exercises you can perform.
For more targeted strengthening, using resistance bands can make a huge difference. Our guide on using an exercise band for ankle strengthening offers some great techniques.
Putting It All Together: A Sample Weekly Plan
A structured plan is the key to making consistent gains without causing a setback. It’s important to balance days focused on strength with days focused on balance, mobility, and recovery.
Here’s a look at how you might organize your week.
Example Weekly Exercise Plan for Building Strength
This schedule provides a framework for building strength and stability while giving your body adequate time to recover and adapt. Listen to your body and adjust as needed.
| Day | Focus | Example Exercises |
|---|---|---|
| Monday | Strength | 3×15 Double-Leg Calf Raises, 3×10 Step-Ups per leg, 3×8 Single-Leg RDLs per leg |
| Tuesday | Balance & Mobility | 3x45s Single-Leg Stance (on pillow), Towel Stretches, Ankle Circles |
| Wednesday | Active Recovery | Light walk on a flat surface or stationary biking for 20-30 minutes |
| Thursday | Strength | 3×10 Single-Leg Calf Raises, 3×12 Squats, 3×10 Lunges |
| Friday | Balance & Mobility | 3x30s Single-Leg Stance (eyes closed), Dynamic balance drills (tossing a ball) |
| Saturday | Active Recovery | Longer walk, swimming, or other low-impact cardio |
| Sunday | Rest | Complete rest. Let your body recover and rebuild. |
This phase is where guidance from a physical therapist can be invaluable. A PT can spot your specific deficits and create a program tailored to your body and your goals, ensuring you progress safely and efficiently.
As you get stronger, you might start thinking about returning to higher-impact activities. For runners, the next step involves building sport-specific resilience. You can learn more about how to strengthen ankles for running with expert-approved exercises as you approach your final recovery goals. It’s all about building a foundation so you can get back to living your life without fear.
Returning to Your Sport and Active Life
You’ve put in the work. You’ve rebuilt strength and found your stability, and you’re starting to feel like yourself again. This is where the real fun begins—closing the gap between the controlled setting of the clinic and the unpredictable demands of your life.
Now, we get to tailor your recovery to get you back to exactly what you love doing.
For one person, that means chasing a grandchild across the lawn without a second thought. For another, it’s stepping back onto the basketball court or toeing the starting line of a marathon. We're shifting from general strengthening to training that is specific to your sport and your life.
Preparing for High-Impact Activities
Your ankle is strong, but is it ready for the sudden stop-and-go of a tennis match or the landing force from a jump? That's the question we need to answer. This phase is all about reintroducing impact and dynamic movement in a smart, progressive way.
We’ll start with plyometrics—exercises designed to build fast, powerful movements. Think of it as spring-loading your muscles and tendons.
A typical progression we use in the clinic looks something like this:
- Two-Foot Hops in Place: Start with small, gentle hops. We’re focused on soft, controlled landings.
- Forward and Backward Hops: Now, we introduce a little movement. Hop a few inches forward, then back, always in control.
- Lateral (Side-to-Side) Hops: This is absolutely crucial for any sport that involves cutting or changing direction.
- Box Jumps (Low Height): We begin with a very low box or even a sturdy step. The goal isn't height; it's the explosive jump up and, even more importantly, the quiet, controlled landing.
These drills retrain your ankle to absorb and produce force quickly, a skill that fades significantly after a fracture and immobilization.
Building Agility and Reaction Time
Life doesn't happen in a straight line. You have to react when you step off a curb you didn't see or sidestep someone in a crowded hallway. Agility drills are how we sharpen that reaction time and rebuild your confidence in the ankle’s ability to keep up.
We often use simple tools to get the job done:
- Agility Ladder Drills: Running quick footwork patterns through a ladder teaches your brain and feet to communicate quickly and precisely. We always start slow and only increase speed once the control is there.
- Cone Drills: Weaving through cones in patterns like a figure-eight challenges your ability to accelerate, decelerate, and change direction smoothly.
Our PT Perspective: The goal here isn't just to get through the drill. It's about doing it without hesitation. We watch our patients' faces just as much as their feet. When we see them stop thinking about the ankle and start focusing on the movement itself, we know real progress is happening.
Are You Truly Ready to Return to Sport?
As physical therapists, our criteria for clearing an athlete to return to their sport go far beyond just being pain-free. Pain is just one piece of the puzzle. We're looking for a specific set of objective measures to ensure your risk of re-injury is as low as we can possibly get it.
Here’s what we’re typically testing:
- Symmetry in Strength: Can you knock out at least 20-25 single-leg calf raises on your injured side with good form? And does it feel about as strong as your uninjured side?
- Symmetry in Power: We’ll use tests like a single-leg hop for distance. You should be able to hop at least 90% as far on your injured leg as you can on your good one.
- Confidence and Control: When you land from a jump, is your alignment solid, or does your knee dive inward? Do you hesitate when we ask you to cut or pivot?
A specialized gait analysis can also reveal subtle compensations you might not even feel. Understanding your unique movement patterns is a huge part of a safe return, which is why we often explore the benefits of gait analysis with our athletes. As you get back to demanding activities like mountain biking, think about overall safety, too. For instance, good protective knee pads for mountain biking can help prevent other issues as you get back on the trail.
Ultimately, the biggest hurdle in this final phase is psychological. Rebuilding trust in your ankle is just as critical as rebuilding its physical strength. That takes time and a lot of positive experiences—every successful hop, jump, and cut builds a new layer of confidence. You've come this far, and we're here to help you cross that final finish line.
Common Questions About Ankle Fracture Recovery
When you're recovering from an ankle fracture, a lot of questions come up. It's natural to feel uncertain about what's normal and what isn't.
Let's get right to the answers our physical therapists give every day for the concerns we hear most often.
Is Some Pain Okay During Exercises?
This is probably the most important question we get. The short answer is that you need to learn the difference between productive discomfort and warning-signal pain.
A gentle stretching sensation or the burn of a muscle that’s working hard is typically okay. That’s your body adapting. But any sharp, stabbing, or sudden spike in pain is an absolute stop sign.
Pushing through that kind of pain is the fastest way to create a setback. Our philosophy is simple: challenge the tissue, don't damage it. If an exercise causes sharp pain, stop immediately.
How Do I Know When It’s Safe to Progress?
It's tempting to rush ahead, especially on days when you feel great. But moving through your exercise progressions too quickly is one of the most common mistakes we see. Real, lasting progress is built on consistency, not speed.
You're generally ready for the next step when you can meet these criteria:
- You complete all prescribed sets and reps of your current exercises with good form and little to no pain.
- You aren't left with significant pain or swelling hours later or the next day.
- You can hit specific clinical milestones. For example, standing on your injured leg for 30 seconds without support or doing 20 single-leg calf raises smoothly.
We often use the "two-day rule" in our clinic. If you perform an exercise and feel good during and for the next two days—with no major increase in pain or swelling—it’s a good sign you're safe to try the next level.
Why Does My Ankle Still Swell Months Later?
First, don't panic. It is completely normal for some swelling to persist for 6 to 12 months after a major fracture. This is especially true after a long day on your feet or a tough rehab session.
The initial injury and any surgery you had disrupts the lymphatic system in your lower leg, which is in charge of clearing out fluid. It simply takes a long time for that system to get back to full capacity.
Continue using elevation and ice as needed, even many months into your recovery. It's not a sign that you're doing something wrong; it’s just a normal part of the long-term healing process.
At Joint Ventures Physical Therapy, we believe a guided recovery is a faster, safer recovery. If you're unsure about your exercises or feel ready to progress with confidence, our team is here to build a personalized plan to get you back to the life you love. Let's move forward, together. Find out more at https://jointventurespt.com.