
Hey there, from your friends at the clinic! We know that an exercise band might look simple, but it's one of the most effective tools we have for building up ankle stability and stopping future injuries before they start. By giving you targeted resistance, these bands wake up and strengthen the small, often-ignored muscles that are absolutely essential for a strong, stable ankle.
Why Your Ankles Need More Than Just Rest

Most of us don't give our ankles a second thought—until they start talking to us. Whether you're a runner logging miles on the Esplanade, a weekend warrior, or just trying to navigate our city's notoriously uneven sidewalks, your ankles are putting in some serious work.
When you get a minor twist or a flare-up of soreness, the usual advice is to just rest. And while that initial rest is important, it doesn't fix the real problem: the underlying instability that led to the pain in the first place.
From Small Tweak To Chronic Problem
Here in the clinic, we see this story play out every single day. A patient comes in with knee or even hip pain, and after our evaluation, we trace the problem right back to weak, unstable ankles. It's a classic example of the kinetic chain—a weak link at the bottom creating trouble all the way up the line.
Just last week, a basketball player came in frustrated that his ankle kept "giving way." He’d rest it, feel better, then sprain it again a few weeks later. This cycle is incredibly common, and we know how frustrating it can be.
The real issue wasn't just the sprain; it was the lack of proactive strengthening afterward. Your body is a master of compensation, and when one area is weak, other parts of your body will try to pick up the slack, often leading to new aches and pains somewhere else entirely.
Understanding Your Ankle's Support System
Your ankle isn't a simple hinge. It’s a complex joint designed to move in multiple directions, held together by a network of muscles and ligaments. The most important muscles control two key movements:
- Eversion: This is when you turn your foot outward. The muscles on the outside of your lower leg control this, and they are your number one defense against rolling your ankle inward—the most common type of ankle sprain.
- Inversion: This is the opposite, turning your foot inward. It's controlled by muscles on the inside of your leg.
If these muscles are weak, your ankle is left vulnerable. This is exactly where using an exercise band for ankle strengthening becomes a game-changer. This simple tool applies targeted resistance to activate and build these crucial stabilizing muscles.
By strengthening these specific movements, you’re not just recovering from an old injury. You're building a more resilient foundation to prevent the next one. It’s all about being proactive. And remember, stability in one joint is often affected by mobility in another. Many of our patients are surprised to learn how limited hip mobility can negatively impact their ankle and foot mechanics. You can read our guide on improving hip mobility to understand how it’s all connected.
Choosing The Right Exercise Band For Your Ankles
Walking into a store or browsing online for an exercise band can feel overwhelming. You’ll see loops, long flat bands, fabric ones, latex ones—it’s enough to make you give up before you even start. Let's cut through that noise and make this simple.
The single biggest mistake we see in the clinic is people starting with a band that’s way too heavy. It’s natural to think "more is better," but that’s not how ankle rehab works. For the small, delicate stabilizer muscles around your ankle, control is everything.
Starting too heavy just forces bigger muscles in your leg to take over, which completely defeats the purpose of the exercise.
Band Type: Loop vs. Flat
For ankle exercises, you're generally choosing between two main types of bands. Each has its place, and the best one often depends on the specific exercise you're doing.
-
Long, Flat Bands (like TheraBands): These are the classic, versatile bands you see in our clinic. They are perfect for seated exercises like dorsiflexion and plantarflexion because you can easily anchor one end around a stable object (like a heavy table leg) and loop the other around your foot.
-
Loop Bands (Mini Bands): These are the smaller, continuous loops. They’re fantastic for exercises where you need resistance between your ankles, like lateral "monster walks," which are great for building both hip and ankle stability at the same time.
We usually tell our patients to start with a set of long, flat bands. They offer the most versatility for the four core ankle movements we'll cover next. Plus, you can always tie them into a loop if you need to.
Which Resistance Band Should You Choose?
Bands are color-coded for a reason, but the system isn't always standard across brands. This quick guide will help you pick the right starting point for effective ankle strengthening, not just for straining your muscles.
| Band Type | Best For | Pro Tip From Our PTs |
|---|---|---|
| Long, Flat Bands | Seated exercises (plantarflexion, dorsiflexion, inversion, eversion) where you need to anchor the band to a post or table leg. | The most versatile option. You can adjust the resistance by grabbing the band closer to or further from the anchor point. |
| Loop Bands (Mini-Bands) | Standing or dynamic exercises like lateral walks, clamshells, or glute bridges where resistance is needed between the limbs. | Great for activating the hips, which is a key part of supporting the ankle. Make sure the band stays flat and doesn’t roll up. |
| Fabric Loop Bands | The same exercises as mini-bands, but they are often more comfortable and less likely to snap or roll up on your skin. | These usually offer higher resistance, so they’re often better for a progression rather than a starting point for ankle-specific work. |
When you’re just starting out or coming back from an injury, always start with the lightest band (often yellow or red). Your goal isn’t to feel a massive burn.
If you can complete 15-20 repetitions with perfect, slow, and controlled form and feel very little challenge, only then are you ready to move up to the next color.
Your Foundational Ankle Strengthening Routine
Alright, let’s get down to the work. This is the routine we give our patients to start rebuilding foundational ankle strength. It’s simple, effective, and you can do it right at home.
We’re going to focus on the four key movements your ankle needs to be strong and stable: Dorsiflexion, Plantarflexion, Inversion, and Eversion.
You don’t need a gym membership. Just grab a chair and an exercise band, and find a stable anchor point like a heavy table or couch leg. The absolute most important thing here is slow, controlled movement. If you’re using momentum, you’re not building strength where it counts.
Dorsiflexion Push Out
Dorsiflexion is just a technical term for pulling your toes up toward your shin. This move is critical. It strengthens the muscles on the front of your lower leg, which help you clear your foot when you walk and stop you from tripping.
To set this up, sit on the floor or a chair with your legs straight out. Hook your band around a sturdy object in front of you and loop the other end over the top of your foot.
Now, pull your foot and toes back toward your shin against the band’s tension. Hold it for a beat, then—and this is the important part—slowly let the band pull your foot back to the start. The real work happens when you resist the band’s pull. A common mistake we see is people using their entire leg. Make sure the movement is coming only from your ankle.
Plantarflexion Pull
This is the exact opposite of the last movement. Think of pointing your toes like you’re pressing a gas pedal. Plantarflexion builds up your calf muscles, which give you the power to push off when you walk, run, or jump.
Stay seated with your leg out straight. This time, loop the band around the ball of your foot and hold the ends in your hands. Create some starting tension by pulling the band toward your body.
Slowly point your toes away from you, pushing against the band. Pause for a second at the end, then control the movement all the way back. Be careful not to bend your knee to get more force; keep that leg straight and let the ankle do all the work.
To get the most out of your exercises, it helps to approach them as part of a structured treatment plan, much like those used by physical therapists.
Inversion Pull
Inversion is when you turn the sole of your foot inward, toward your other foot. This is a huge component of ankle stability, as it strengthens the muscles on the inside of the ankle.
For this one, your setup matters. If you’re working your right ankle, anchor the band to something on your left. You can cross your left leg over your right to help. Loop the band around the top of your right foot, letting it pull your foot slightly to the left.
From there, slowly pull your foot inward and upward against the band. Feel the muscle on the inside of your ankle engage. Again, don’t rotate your whole leg from the hip. Your kneecap should point straight up to the ceiling the entire time.
This handy visual shows how to choose the right resistance level as you get started.
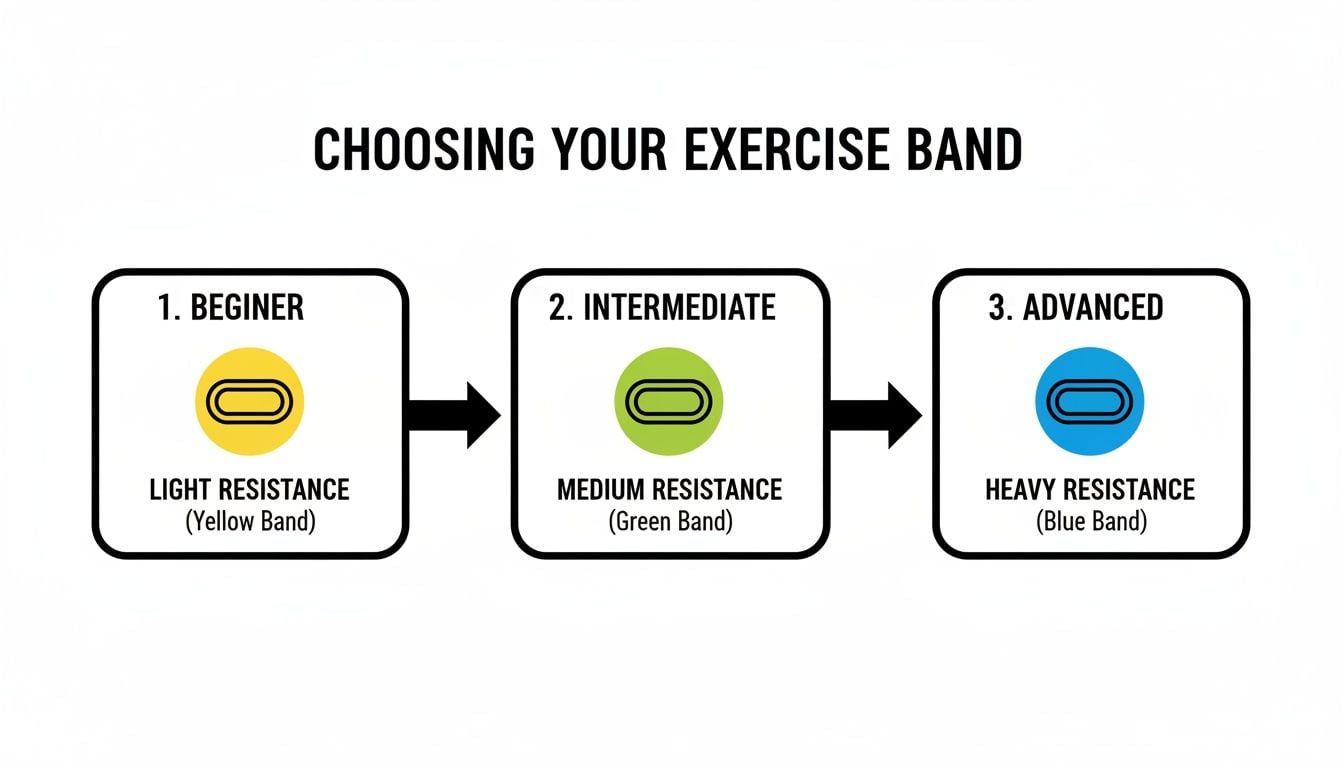
The key takeaway is to always begin with the lightest resistance to ensure you master the form before adding a challenge.
Eversion Push
Finally, eversion. This means turning the sole of your foot outward, away from your body. This is probably the single most important exercise for preventing the common “inward roll” ankle sprain.
Stay seated. To work your right ankle, anchor the band to your right side. Loop the band around the outside of that same foot, letting it create a slight inward pull.
Push your foot outward and slightly up against the band’s resistance. You should feel the muscles on the outside of your lower leg and ankle firing. Hold briefly, then control the return back to the starting position. Just like with inversion, watch that your hip isn’t doing the work.
Using an exercise band for ankle strengthening is a staple in rehab for a reason. While high-tech machines might produce slightly bigger strength gains in a lab, research shows that simple bands deliver significant, real-world improvements in ankle strength and function. They’re an incredibly effective and accessible tool.
Your Starting Goal: For each of these four exercises, aim for 2-3 sets of 15 repetitions. The movement should be smooth and pain-free. If you can’t complete the set with perfect form, the resistance is too high.
This routine hits all the primary movers of the ankle, creating a balanced foundation of strength. As your stability improves, you’ll be much better prepared for more dynamic activities. And speaking of stability, our guide on the best balance exercises for seniors has tips that can benefit people of any age. Consistency is your best friend here.
How to Progress Your Routine and Break Through Plateaus
You’ve been putting in the work, and your ankle is feeling stronger. That’s a huge win. But eventually, what once felt challenging starts to feel… easy. Your body is smart and incredibly efficient; it adapts.
When this happens, you’ve hit a plateau. It’s a completely normal part of any strength program and, frankly, it’s a good sign. It tells us you’re ready for the next step. Sticking with the same routine forever will only maintain your current strength, not build on it. To develop truly resilient ankles, we have to talk about progression.
How to Know When It’s Time to Level Up
The big question I always get from patients is, “How do I know when to grab a tougher band?” The answer isn’t a date on the calendar, but how the exercises feel.
You’re probably ready to move up when you can tick these boxes:
- You can finish all your reps and sets (2-3 sets of 15) with perfect form.
- Your movements are smooth and controlled, not shaky or strained.
- You aren’t feeling much of a burn or fatigue by the end of your last set.
- Most importantly, you’re performing every single rep completely pain-free.
If that sounds like your current situation, it’s time to try the next color band. This is the most straightforward way to progress with your exercise band for ankle strengthening, but it’s certainly not the only tool in our toolbox.
Don’t just jump to the heaviest band you can find. A small increase in resistance makes a huge difference for these smaller ankle muscles. The goal is always to challenge the muscle, not strain the joint.
More Ways to Progress Than Just a Stronger Band
Sometimes, the best way to make an exercise harder has nothing to do with the band itself. These are techniques we use in the clinic all the time to fine-tune motor control and build real-world endurance.
Add Isometric Holds
Instead of just moving back and forth, I want you to pause at the hardest part of the movement. For an eversion exercise, for example, push your foot out against the band and just hold that peak contraction for 3-5 seconds. This forces the muscle to stay engaged, which is fantastic for building rock-solid stability.
Increase Your Range of Motion
Try to safely explore how far you can move your ankle against the band’s tension. If you’ve been making small, cautious movements, see if you can gently push that boundary a little further. The key here is to move slowly and make sure the work is coming from your ankle—don’t let your knee or hip jump in to help.
Play With Your Tempo
Slowing down the movement is a simple but incredibly effective trick. A slower tempo increases the muscle’s “time under tension,” forcing it to work harder through the entire range. A great way to do this is with a 3-1-3 count: take three seconds to perform the main action (like pointing your toes), hold for one second at the end, and then take three full seconds to return to the starting position.
Why Sticking With It Matters
Progression isn’t just about what you do in one workout; it’s about your commitment to the program over weeks and months. You can’t undo chronic instability with a few sessions. Real, lasting change in your muscles, tendons, and even your brain’s connection to your ankle happens over time.
This is especially critical for anyone dealing with chronic ankle instability (CAI), which can develop in up to 40% of people after just one ankle sprain. The research is clear: exercise programs that last longer than four weeks show far better results in balance and function than shorter attempts. Consistent training with an exercise band is how you build stability you can actually count on. You can read more about these findings over on Physiotutors.com.
When To See A Physical Therapist About Your Ankle Pain
As physical therapists, we love seeing people take an active role in their own recovery. An exercise band for ankle strengthening is a powerful tool, and a well-designed home program can make a world of difference.
But it’s not always the best place to start. A key part of any successful recovery is knowing when to self-manage and when it’s time to get a professional opinion.
Clear Signs You Need A PT Evaluation
If you’re dealing with any of the following, it’s time to hit pause on the home exercises and get a proper diagnosis. Trying to push through these symptoms often backfires and can make the original problem much worse.
- Pain that gets worse, not better: If you notice your pain increasing during or after these exercises, that’s your body sending a loud and clear signal that something isn’t right.
- Sharp, shooting, or radiating pain: A dull ache from muscle fatigue is one thing. Sharp, zinging, or traveling pain is another entirely and could point to nerve irritation or a more serious injury.
- Significant swelling that won’t go down: Swelling that sticks around indicates ongoing inflammation or an issue your body can’t resolve on its own.
- A feeling of instability or “giving way”: Does your ankle feel like it might just buckle when you’re walking or going down stairs? This suggests a level of ligament instability that requires a more structured, supervised approach.
Knowing when to ask for help is the strongest move you can make for your recovery. A physical therapist isn’t just for post-surgery rehab; we’re movement experts who can diagnose the root cause of your pain.
What A Physical Therapist Can Offer
That “simple tweak” in your ankle might be more complex than it feels. It could involve underlying ligament damage, poor joint mechanics, or even problems that actually start in your hip or foot.
A physical therapist can:
- Provide a precise diagnosis: We’ll figure out exactly what’s causing the pain—it’s not always what you think.
- Use hands-on techniques: Manual therapy can improve joint mobility and release tight tissues in ways exercises alone can’t touch.
- Create a truly personalized plan: We’ll build a program around your specific injury, your goals, and your lifestyle.
This is especially true if you’re a runner. A PT can provide guidance that not only helps your ankle heal but also prevents re-injury down the road. This often includes a targeted analysis of your running mechanics. For more details on that, you might be interested in our guide on how to improve running form.
Ultimately, a PT can build a plan that makes you a more efficient and resilient athlete.
Common Questions About Ankle Strengthening
In the clinic, we hear a lot of the same questions about ankle strengthening. That’s a good thing—it means people are engaged in their own recovery. Here are the answers to the questions that come up most often.
How Often Should I Do These Ankle Exercises?
To build real, lasting strength, you have to be consistent. For most people starting a new program, we recommend performing these ankle exercises three to five times per week.
This gives your muscles the stimulus they need to adapt and get stronger, while still leaving enough time for rest and recovery. Strength isn’t built during the workout; it’s built in the days after. Always listen to your body—if you feel unusually sore, it’s smart to take an extra day off.
For runners, this is especially true. We know from research that exercise programs performed at least three times a week are highly effective for correcting faulty running mechanics and building the resilience needed to head off future injuries.
Can I Use Bands If I Just Sprained My Ankle?
This is a critical question, and timing is everything. If you just sprained your ankle—meaning it’s swollen, painful, and hard to put weight on—the answer is a firm no.
In that early, acute phase, your only job is to focus on rest, protection, and managing the swelling. Once the initial pain and swelling have significantly subsided and you can move your ankle through its range of motion without the band, that’s when you can start thinking about light resistance.
This is best done under the guidance of a physical therapist to make sure you’re not pushing too hard, too soon.
My Hips Or Knees Hurt When I Do Ankle Exercises. Is That Normal?
No, that’s not normal. It’s a big red flag that something is off with your form. This is a classic compensation pattern we see all the time in the clinic.
If you feel your hip flexors or quad muscles firing up during an ankle exercise, it means those bigger, stronger muscles are taking over the work. This completely defeats the purpose of using an exercise band for ankle strengthening, which is to isolate the small stabilizing muscles around the ankle itself.
If you notice this happening, stop immediately and reset. Try grabbing a lighter band or simply moving your hands further from your foot to reduce the tension. Focus on making the movement smaller and slower, making sure your knee stays completely still. The work should only come from your ankle. It’s all about control, not brute force.
At Joint Ventures Physical Therapy, we provide the expert guidance you need to move past pain and get back to the activities you love. If you’re struggling with ankle pain or want a personalized plan to build strength, we’re ready to help. Schedule your 1-on-1 appointment with one of our expert clinicians today.