Navigating Boston’s charming but often uneven sidewalks, from the cobblestones of the North End to the brick paths of Beacon Hill, requires confidence and stability. As we age, our balance system—a complex interplay between our inner ear (vestibular system), vision, and sensory feedback from our joints (proprioception)—naturally changes. This can lead to an increased risk of falls, a major concern for older adults that can compromise independence and quality of life.
At Joint Ventures Physical Therapy, we see firsthand how targeted balance training is not just about preventing falls; it’s about empowering our Boston-area clients to continue enjoying everything our city offers, from a stroll along the Charles River to confidently managing stairs at home. A significant benefit of enhancing balance is the reduction of fall risks. Learning about comprehensive Fall Prevention Programs for Seniors can provide a structured approach to improving stability and maintaining an active lifestyle.
This guide, written by our expert Boston physical therapists, moves beyond generic advice. We will detail some of the best balance exercises for elderly individuals that we use in our clinics to rebuild stability, enhance motor control, and restore confidence. We'll explain the clinical science behind each movement, how it translates to real-world activities in Boston, and when it’s time to seek a personalized assessment from a licensed physical therapist to ensure you’re training safely and effectively for your specific needs.
1. Tandem Stance / Tandem Walking (Heel-to-Toe Standing & Walking)
The tandem stance and its dynamic counterpart, tandem walking, are foundational exercises for improving balance in older adults. By positioning one foot directly in front of the other, you create a very narrow base of support. This forces your body's balance systems, including your inner ear (vestibular system), your sense of joint position (proprioception), and your vision, to work much harder to maintain stability. This is why it’s a staple in both beginner fall-prevention programs and advanced rehabilitation protocols at our Boston physical therapy clinics.

This exercise directly trains the precise control needed for walking and turning, which are common activities that can lead to falls. The heel-to-toe pattern mimics the single-leg support phase of gait, strengthening the muscles in your feet, ankles, and hips that are critical for stability on uneven surfaces. For our patients in Boston, this can mean navigating cobblestone streets in Beacon Hill or icy sidewalks with greater confidence.
How to Perform Tandem Stance & Walking
Tandem Stance (Static Hold):
- Stand next to a sturdy surface like a kitchen counter or a wall for support.
- Place the heel of one foot directly in front of the toes of the other foot, as if you are standing on a tightrope.
- Hold this position for 10-30 seconds, using the counter for support as needed.
- Switch the position of your feet and repeat.
Tandem Walking (Dynamic Movement):
- Place a straight line of tape on the floor, about 10-15 feet long.
- Stand at one end, and walk along the line by placing the heel of your stepping foot directly in front of the toes of your back foot with each step.
- Keep your eyes focused on a point in front of you, not down at your feet.
- Use a wall or a countertop for support if you feel unsteady.
Progressions and Safety
Physical Therapist Tip: The goal is to challenge your balance without compromising safety. Never perform these exercises if you feel dizzy or acutely unwell. If dizziness occurs, stop immediately and consult a physical therapist in Boston who can screen for underlying vestibular issues.
- Beginner: Start by holding the tandem stance with both hands on a stable surface. As you improve, reduce support to one hand, then just one or two fingertips.
- Intermediate: Once the static hold feels stable, progress to tandem walking along a line. Focus on slow, deliberate steps and accurate foot placement.
- Advanced: To increase the challenge, try walking without any hand support. You can also add a cognitive task, like counting backward from 100 by threes, or gently turning your head from side to side as you walk. These additions better simulate the real-world complexities of walking in a busy Boston neighborhood.
At Joint Ventures Physical Therapy, we frequently use tandem walking as both an assessment tool and a treatment exercise for patients recovering from orthopedic surgery or managing neurological conditions. Mastering this skill is a significant step toward improving your balance to prevent falling on ice and other challenging surfaces.
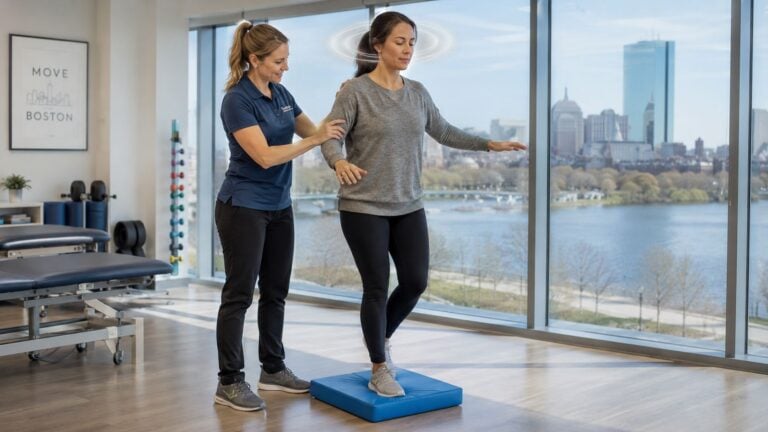
2. Single-Leg Stance (Unilateral Weight Bearing)
The single-leg stance is one of the most effective and widely recognized balance exercises for elderly individuals. By shifting your entire weight onto one foot, you drastically reduce your base of support. This action directly challenges and strengthens the complex neuromuscular pathways between your brain, nerves, and muscles responsible for maintaining your upright posture. It is considered a gold-standard clinical measure for assessing dynamic balance and predicting fall risk in our Boston physical therapy clinics.

This exercise specifically targets the small stabilizing muscles in your ankles and the larger abductor muscles in your hips, both of which are critical for side-to-side stability. Every time you walk, you momentarily stand on one leg, making this drill a direct simulation of a key part of the gait cycle. Improving single-leg balance gives our patients greater confidence when stepping off a curb in the South End or navigating an uneven path in the Boston Public Garden. It's a key component of evidence-based programs like the Otago Exercise Program, often used in gerontology research and senior fitness settings.
How to Perform the Single-Leg Stance
- Stand behind or next to a sturdy chair, kitchen counter, or wall, placing your hands on it for initial support.
- Shift your weight onto one foot, keeping a slight bend in that knee.
- Slowly lift the opposite foot a few inches off the floor.
- Focus on a spot in front of you to help maintain your balance.
- Hold the position for 10-30 seconds.
- Lower your foot back to the ground with control and repeat on the other side.
Progressions and Safety
Physical Therapist Tip: Consistency is crucial for building new motor patterns. Aim to practice this exercise for a few minutes 5-7 days per week. If you experience significant wobbling or dizziness, it may indicate a vestibular issue that a qualified Boston PT clinic can properly diagnose.
- Beginner: Start by holding the position for just 5-10 seconds while keeping both hands on a supportive surface. As you feel more stable, progress to using just one hand, then only your fingertips.
- Intermediate: Work toward holding the stance for 30 seconds without any hand support. Using a mirror can help you monitor your posture and ensure your trunk stays upright without leaning to one side.
- Advanced: To make it more difficult, try closing your eyes for a few seconds (with support nearby). You can also add gentle arm movements, like raising them overhead, or perform a small reaching task to challenge your stability further.
At Joint Ventures Physical Therapy, the single-leg stance is a fundamental part of our orthopedic physical therapy programs for conditions like ACL tears or ankle injuries. Mastering this skill is a cornerstone of any effective plan to build the best balance for elderly individuals and prevent falls.
3. Sit-to-Stand Transfer Training
The sit-to-stand transfer is one of the most fundamental movements we perform daily, yet it is a complex balance exercise in disguise. This seemingly simple action requires significant lower body strength, core stability, and the coordinated ability to shift your body weight forward and upward. For older adults, difficulty with this movement is a major indicator of reduced independence and an increased risk of falls, making it a critical focus in our Boston physical therapy programs.
Training the sit-to-stand movement directly builds strength in the quadriceps, glutes, and hamstrings, the primary muscles responsible for lifting you out of a chair. It also refines the motor control needed to manage your center of gravity during the transfer. Mastering this skill is essential for everything from getting out of bed to standing up from the dinner table. It is a cornerstone of post-hip replacement rehabilitation and a key component of evidence-based fall prevention protocols like the Otago Exercise Program.
How to Perform the Sit-to-Stand
- Choose a sturdy, firm chair that isn't too low, preferably one with armrests for initial support.
- Sit on the front half of the chair. Position your feet flat on the floor, about hip-width apart, and slightly behind your knees.
- Lean your chest forward, bringing your "nose over your toes." This shifts your weight onto your feet.
- Push forcefully through your heels to stand up straight, fully extending your hips and knees. Use the armrests for a push-off if needed.
- To sit back down, reverse the motion with control. Push your hips back, bend your knees, and slowly lower yourself onto the chair. Avoid plopping.
Progressions and Safety
Physical Therapist Tip: Control is more important than speed. The slow, controlled descent is just as important as the stand-up phase, as it builds eccentric strength. If you have knee or hip pain, start with a higher chair or place a firm cushion on the seat to reduce the range of motion.
- Beginner: Use your hands on the armrests to assist with both standing up and sitting down. Focus on mastering the "nose over toes" motion before you push up.
- Intermediate: Progress to performing the exercise with your arms crossed over your chest, relying solely on your leg strength. This is a common test used in physical therapy clinics in Boston to measure functional strength.
- Advanced: Increase the challenge by holding a light weight (like a book or a can of soup) at your chest. You can also work on standing up and sitting down more slowly to increase the time your muscles are under tension.
At Joint Ventures Physical Therapy, we use the sit-to-stand as part of functional assessments like the Timed Up and Go (TUG) test. Improving your ability to perform this transfer not only makes daily life easier but is also linked to better overall posture and body mechanics. For more details on how standing and sitting affect your body, you can learn more about proper posture here.
4. Gait Training with Perturbations (Stepping Around Obstacles)
Life isn't a straight, clear path; it's filled with unexpected curbs, furniture legs, and uneven sidewalks. Gait training with perturbations, or the practice of walking while stepping over and around obstacles, is one of the best balance exercises for elderly individuals because it directly simulates these real-world challenges. This dynamic exercise trains reactive balance, forcing your brain and body to anticipate, plan, and execute movements quickly to avoid a trip or fall. It's a key component of functional rehabilitation at our Boston physical therapy clinics.
By intentionally introducing "perturbations" or disturbances to your walking pattern, this exercise improves motor planning, spatial awareness, and the strength of the hip and leg muscles needed to lift your feet clear of hazards. Mastering this skill is crucial for safely navigating a cluttered home, a busy Boston street, or an unfamiliar environment. It trains the very reactions that prevent a simple misstep from turning into a serious injury.
How to Perform Gait Training with Perturbations
- Set up a clear, well-lit walking path, about 10-15 feet long, next to a wall or sturdy countertop for support.
- Place several soft, low-profile objects on the floor along the path. Good starting objects include rolled-up towels, small pillows, or soft foam blocks.
- Walk along the path at a slow, controlled pace, deliberately lifting your feet to step over each object.
- Focus on landing softly and maintaining your balance before proceeding to the next obstacle. Turn around and repeat the course.
Progressions and Safety
Physical Therapist Tip: The key is to create a challenge that is manageable but not overwhelming. The goal is to build confidence, not fear. Always ensure a clear area around the exercise path, free of any additional trip hazards.
- Beginner: Start with very low, brightly colored obstacles. Keep a hand on a wall or have a spotter walk alongside you. Focus entirely on the task of stepping over the objects.
- Intermediate: Gradually increase the height or variety of the obstacles. Try placing them at irregular intervals to challenge your motor planning. Reduce your hand support to just a few fingertips.
- Advanced: To make this one of the most effective balance exercises for elderly clients, we add cognitive challenges. Try counting backward by sevens or naming different Boston neighborhoods as you walk the course. This dual-tasking practice is critical, as most falls happen when we are distracted. To learn more about how your brain handles multiple tasks, explore our article on dual-tasking and its importance in daily life.
At Joint Ventures Physical Therapy, we create customized obstacle courses to help patients post-stroke or after orthopedic surgery regain their ability to navigate their homes and communities safely. This training is fundamental to rebuilding functional independence and preventing falls.
5. Standing Marching in Place (High-Knee Lifts)
Standing marching is a dynamic balance exercise that builds core stability, hip flexor strength, and the single-leg stance control essential for everyday mobility. By lifting one knee at a time, you rhythmically shift your weight and challenge your body to maintain an upright, stable posture. This movement directly translates to functional activities like climbing stairs, stepping over a curb, or simply clearing your foot while walking to prevent a trip.
This exercise is particularly valuable because it combines static balance (holding steady on one leg) with controlled, dynamic movement (lifting the other). At our Boston physical therapy clinics, we often incorporate marching into warm-ups for wellness classes and as a core component of post-hip replacement rehabilitation. It safely rebuilds the strength and proprioception needed to navigate the busy, uneven sidewalks of neighborhoods like the South End or Back Bay.
How to Perform Standing Marching
- Stand tall in front of a sturdy surface, like a kitchen counter or the back of a solid chair, placing your hands on it for support.
- Engage your core muscles by gently pulling your belly button in toward your spine. Keep your chest up and shoulders back.
- Slowly lift one knee up toward your chest to a comfortable height, as if you are marching in slow motion. Avoid leaning back or to the side.
- Hold for a brief moment before lowering the foot back to the floor with control.
- Alternate legs, lifting the other knee. Aim for a smooth, steady rhythm.
- Continue for 30-60 seconds, focusing on quality of movement over speed.
Progressions and Safety
Physical Therapist Tip: Your goal is to maintain a completely upright posture. If you find yourself leaning heavily to one side as you lift a knee, reduce the height of the lift. A smaller, controlled march is far more effective than a high lift that compromises your form.
- Beginner: Start by holding onto a counter with both hands and lifting your knees only a few inches off the floor. The primary focus is on the controlled weight shift.
- Intermediate: Progress to using only one hand for support, then just a few fingertips. Gradually increase the height of your knee lifts, aiming for a 90-degree angle at the hip if possible.
- Advanced: Perform the exercise without any hand support. To further challenge your balance and coordination, you can add arm swings (opposite arm to opposite leg) or incorporate music with a steady beat to guide your pace.
At Joint Ventures Physical Therapy, we find that mastering standing marching is a key indicator of improved functional balance. It’s one of the most accessible yet effective balance exercises for elderly individuals, building the strength and confidence needed to remain active and independent in the Boston community.
6. Wall or Counter Push-Aways (Dynamic Balance with Upper Extremity)
The Wall or Counter Push-Away is an excellent exercise that integrates upper body strength with dynamic balance control. It trains your body to maintain stability while your center of gravity shifts forward and backward, a common movement during daily activities like reaching into a cabinet or pushing a door open. This controlled weight shifting is crucial for developing the reactive strategies needed to prevent a fall if you lose your balance.
At our Boston physical therapy clinics, we often incorporate this exercise into programs for patients recovering from shoulder surgery or for those who need to regain confidence after a near-fall. It safely mimics the action of using your arms to brace against a wall or object to regain stability. By strengthening the muscles of the chest, shoulders, and core in an upright position, it improves both your strength and your ability to coordinate that strength to stay balanced, making it one of the best balance exercises for elderly individuals seeking functional independence.
How to Perform Wall or Counter Push-Aways
- Stand facing a wall, about an arm’s length away, with your feet hip-width apart for a stable base.
- Place your hands flat on the wall at shoulder height and width.
- Keeping your body in a straight line from head to heels, engage your core muscles.
- Slowly bend your elbows and lean your body toward the wall in a controlled manner.
- Gently push back to the starting position, straightening your elbows without locking them.
- Perform 8–12 repetitions. Aim for 2-3 sets, 3-5 times per week.
Progressions and Safety
Physical Therapist Tip: The key to this exercise is control, not speed. Focus on maintaining a straight, rigid trunk throughout the movement. Avoid letting your hips sag or your lower back arch. This ensures you are challenging your balance and core, not just straining your back.
- Beginner: Start closer to the wall. This reduces the amount of body weight you have to control, making the movement easier. Focus entirely on smooth, steady form.
- Intermediate: Once you can comfortably perform the exercise, step your feet farther back from the wall. This increases the challenge to your core and upper body. You can also try bringing your feet closer together to narrow your base of support.
- Advanced: To further challenge your balance, perform the push-away while standing on one leg. Hold the single-leg stance for the entire set of repetitions, then switch legs for the next set. This is an advanced progression that significantly tests your stability.
At Joint Ventures Physical Therapy, we use the Wall Push-Away to help clients in Boston build the specific strength and control needed to navigate their environment safely, from pushing a heavy door at a local shop to recovering balance on an uneven sidewalk in the South End.
7. Backward Walking (Retro-Walking)
Walking backward, or retro-walking, is an advanced balance exercise that challenges the brain and body in ways that forward walking does not. By reversing your normal gait pattern, you activate different neural pathways and muscle groups. This movement requires greater awareness of your body in space (proprioception) and forces your vestibular system to work harder to maintain equilibrium without the usual visual cues. At our Boston physical therapy clinics, we introduce retro-walking in later stages of rehabilitation to build confidence and fine-tune dynamic stability.
This exercise is particularly effective because it strengthens the posterior chain muscles, including the glutes and hamstrings, which are crucial for pelvic stability and preventing falls. It also improves coordination and motor control, as your brain must process sensory information differently. For our active elderly patients in Boston, mastering backward walking can translate to better reaction times and improved stability when navigating crowded sidewalks or making sudden changes in direction.
How to Perform Backward Walking
- Find a clear, unobstructed space, like a hallway, with a wall or handrail nearby for support. Having a spotter stand in front of you (the direction you are moving) is highly recommended when you first start.
- Stand tall with your chest up and engage your core muscles to maintain an upright posture.
- Initiate the movement by reaching back with one leg, landing on the ball of your foot first, and then rolling back to your heel.
- Step back with your other leg, maintaining a slow and controlled pace.
- Keep your steps relatively short to start, focusing on smooth, deliberate movements over a short distance of 10-20 feet.
Progressions and Safety
Physical Therapist Tip: Safety is the top priority with this advanced exercise. Always ensure your path is completely clear of obstacles, pets, or tripping hazards before you begin. Stop immediately if you feel dizzy or excessively unstable, and consult your physical therapist.
- Beginner: Start by taking just a few steps backward while holding onto a kitchen counter or a sturdy railing with both hands.
- Intermediate: Progress to walking backward along a wall, keeping one hand lightly on it for support. Focus on increasing the distance you can walk safely and maintaining good form.
- Advanced: Once you feel confident, try walking backward in an open space without any hand support. You can increase the challenge by walking at a slightly faster pace or gently turning your head from side to side to further test your vestibular system.
In our orthopedic physical therapy Boston clinics, we use retro-walking as a discharge-level activity to ensure patients are fully prepared to return to their daily lives. It's a powerful tool for building the high-level balance control needed for comprehensive fall prevention and confident mobility.
7-Exercise Balance Comparison for Older Adults
| Exercise | Implementation complexity | Resource requirements | Expected outcomes | Ideal use cases | Key advantages |
|---|---|---|---|---|---|
| Tandem Stance / Tandem Walking (Heel-to-Toe) | Low → Moderate (easy static to challenging dynamic/progressive) | Minimal — marked line, chair/hand support; supervision for advanced/eyes-closed | Improved narrow-base stability, proprioception, vestibular adaptation, reduced fall risk | Balance assessment, early-to-advanced rehab, fall-prevention classes, vestibular programs (graded) | High transfer to real-world balance, clear progression, minimal equipment |
| Single-Leg Stance (Unilateral Weight Bearing) | Moderate (simple to advanced with eyes closed/reaching) | Minimal — countertop/parallel bars for support; supervision if high fall risk | Improved unilateral stability, ankle/hip strength, measurable fall-risk prediction (hold time) | Post-op rehab, fall-risk screening, gait and stair readiness | Highly functional, strong evidence base, easy to quantify/progress |
| Sit-to-Stand Transfer Training | Low → Moderate (technique and strength dependent) | Chair (sturdy), armrests optional, resistance bands for progression | Increased lower-extremity strength, transfer independence, mobility, lower fall risk | ADL training, post-hip/knee rehab, deconditioning, TUG assessment | Directly functional, combines strength and balance, easily modified |
| Gait Training with Perturbations (Obstacles) | Moderate → High (requires planning, safety, progressive difficulty) | Space, obstacles (cones/foam), spotter/parallel bars, therapist supervision | Improved reactive stepping, motor planning, spatial awareness, confidence in complex environments | Post-stroke gait retraining, dynamic balance rehab, community fall-prevention programs | Trains real-world challenges, engaging/adaptable, improves reactive balance |
| Standing Marching in Place (High-Knee Lifts) | Low (safe, low-impact) | Minimal — optional hand support or music for cadence | Improved hip flexor strength, core stability, step clearance, basic cardiovascular benefit | Warm-ups, group classes, early post-op rehab, Parkinson's gait initiation | Safe and low-impact, adjustable intensity, rhythmic for adherence |
| Wall or Counter Push-Aways (Dynamic Upper-Ext) | Low → Moderate (technique and load progression) | Wall or counter, minimal space | Combined standing balance and upper-extremity strength, improved pushing/reaching function | Post-shoulder rehab, in-home balance-strength programs, occupational therapy | Trains strength and balance together, safe/contained, easily progressed |
| Backward Walking (Retro-Walking) | Moderate → High (reduced vision, spatial demand, supervision advised) | Clear hallway, spotter/support, supervision for safety | Enhanced proprioception, posterior-chain activation, novel gait patterns, improved spatial awareness | Advanced gait retraining, late-stage vestibular rehab, athlete and highly functional elderly training | Targets different neural/muscle patterns, novel and motivating, strengthens posterior chain |
Take the Next Step: Your Personalized Balance Plan in Boston
You've just reviewed a powerful toolkit of the best balance exercises for elderly individuals, from the foundational Single-Leg Stance to the dynamic challenge of Backward Walking. Mastering these movements provides a solid base for improving stability, reducing your risk of falls, and building the confidence needed to live an active, independent life here in Boston. The key takeaway from this guide is that balance is a trainable skill, not a fixed state. Consistent, mindful practice of exercises like Tandem Walking and Sit-to-Stands can directly improve your body's ability to react to unexpected shifts in your center of gravity.
However, this list is a starting point, not a universal prescription. The true value of these exercises is unlocked when they are applied correctly to your unique situation. Balance is a complex system involving strength, sensory input from your feet and eyes, and your inner ear (vestibular system). A slight weakness in your hip abductors, a change in your vision, or a history of ankle sprains can all dramatically alter which exercises are most effective and, more importantly, which are safe for you. This is where the clinical expertise of a Boston physical therapist becomes indispensable. A generic approach simply cannot account for these individual factors.
Why a Generic Plan Isn't Enough
Relying solely on a general list of exercises can be ineffective or even counterproductive. Your body may be compensating for an underlying issue that a standardized routine won't address. For instance, if your instability stems from vestibular issues, focusing only on strengthening your legs will miss the root cause. This is why a thorough evaluation is the critical first step toward meaningful progress.
At our Boston PT clinics, we don't just hand you a sheet of exercises. Our licensed physical therapists conduct a comprehensive assessment that includes:
- Gait Analysis: We watch you walk to identify subtle asymmetries or biomechanical flaws that could contribute to instability.
- Strength and Mobility Testing: We pinpoint specific muscle weaknesses or joint restrictions that are holding you back.
- Sensory System Evaluation: We assess how well your body uses information from your eyes, joints, and inner ear to maintain equilibrium.
Based on this detailed analysis, we design a personalized 1-on-1 treatment plan. We might discover that progressing your Single-Leg Stance is the priority, or we may determine that focusing on manual therapy to improve ankle mobility is needed before you can safely perform more dynamic drills. This level of individualized care ensures you are performing the right exercises, at the right intensity, for your specific needs. To diversify your routine and explore complementary methods, you might also consider incorporating more extensive yoga-inspired balance improvement exercises.
Taking Control of Your Stability in Boston
Whether you’re navigating the cobblestones of the North End or enjoying a walk along the Charles River, confident balance is essential to enjoying all that our city has to offer. Don't wait for a fall or a close call to prioritize your stability. The exercises in this guide are your first step. Your next step is to partner with an expert who can tailor a program that guarantees safety and delivers real results. By seeking professional guidance, you are taking a proactive measure to protect your health, maintain your independence, and continue to live life on your own terms.
Ready to move with greater confidence and stability? The movement specialists at Joint Ventures Physical Therapy are here to help. Our team provides 1-on-1, evidence-based care to identify the root cause of your balance issues and build a personalized plan for lasting improvement. Schedule your evaluation at one of our convenient Boston-area clinics today and take the definitive step toward a safer, more active future.